How to set the ThriftShave on Center Posted on Apr 8, 2019
In October of 2009, Peterson Tool Company began providing a “Center Gage Pin” with every new ThriftShave design package. This pin has been included to reduce the time required for the initial centering adjustment and to help minimize any setting errors that might occur.
Whether this is a single part or a multiple part package, the gage pin should be used to set the ThriftShave fixture on center. If there are several parts to be shaved, only the first part in the package requires setting. Once center has been set no further adjustments are warranted for other parts. These instructions will assist you in this adjustment. If center is not set correctly the ThriftShave will not size the part correctly and tool life or part finish may be affected.

When the center of the shave roll, part and face of the insert are in the same plane center has been reached. We recommend and regulate the length of the gage pin to place the insert .010” ahead of center, which is the optimal setting point for our inserts.
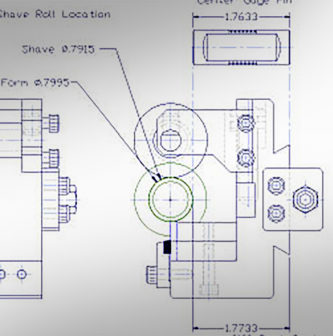
The ThriftShave insert assembly print, provided in the approval process, indicates the lateral location PTC has determined to place the shave roll. This will also be the diameter on which center is to be set. (Special cases will be noted on the assembly.)
In the majority of cases this diameter is preceded by our form insert. This contributes to the shave tools performance enhancing: finish, sizing and tool life. Set the form to the diameter indicated on its’ assembly drawing. If this is not a PTC tool, set the blank diameter of the form tool .008” larger than the finish shave dimension.

Rough mount the shave fixture on the host machine’s slide once the preceding tool has been set. Secure the ThriftShave Head in the fixture to rough set the lateral location of the ThriftShave Fixture. Tighten the hold down bolts of the fixture and remove the head. If it is possible, turn off the feed and bring one part, (that has been formed to its correct dimensions) into the shaving position. Run the machine to the position’s high point or to the dwell portion of the cam and stop the machine.
Loosen the hold down bolts on the fixture so that center may be adjusted. Place the gage pin on the face of the dovetail cut out on the holder. Align the pin with the diameter on which center is to be set. (Refer to the ThriftShave insert assembly drawing) While holding the pin square to the face of the cut out and on the approximate center line of the part advance the fixture forward until the pin touches the form blank. Remove the pin and tighten the hold down bolts. The holder is now .010” ahead of center and properly adjusted. Forward the machine so that the slide retracts. The ThiftShave Head assembly may now be reinstalled. Adjust diameter, taper and location to suit the part.

